Silhouette Cameo: "December" Handwritten Title

Hi there! How is everyone's December coming along? Today, I thought I'd share a bit about how I created the "December" handwritten die cut title in my

December Daily album

.

Anyone who has the 

Silhouette Cameo

 probably LOVES it just for this kind of application. I wanted my own handwriting to be captured in our December Daily, and the 

Silhouette Cameo

 is perfect for this.

Materials used:

See this

blog post

for details.

Here's a quick how-to:

  1. Write your word in script using a tablet and pen in Photoshop and save it as  JPG file. Or write your word using a black Sharpie marker on a white piece of cardstock and scan the word into a JPG file.
  2. Then open the file in your Silhouette Studio software.
  3. Trace the area where the word is. (Menu > Object > Trace > Select Trace Area and create a box around the area you want to trace)
  4. Play with the filters on the right side until you have a nice trace line around the word.
  5. Simple remove the JPG from the background and you'll have a nicely traced word you can cut with the Silhouette Cameo.

I love this technique when you're looking for a nice handwritten title for scrapbook pages or even sentiments on cards.

Thanks for stopping by!

- KRAFTY pearl

Mama Elephant: Stamps Perfect for December Daily

Hi there! I'm over at the Mama Elephant blog today, to share the December Daily foundational pages I made in November. Here you'll find all 31 layouts so far... This is my third year making a December Daily album and I absolutely love it! You can see 2011 here and 2012 here. Every now and then, my husband and I really enjoy flipping through the other two years to see how every holiday season has evolved for us. Since December is always a busy month (and even November), I put together all of the foundational pages so that I can simply print/slip photos and journaling into the pockets.

Mama Elephant Inline Letter stampscoordinating Creative Cuts dies, and Embellished Tag Creative Cuts die are perfect for this project. In fact many of Mama Elephant's latest releases are perfect for December Daily. I have been documenting 2013 Project Life in 6x8 Simple Stories Snap albums because this was my first year at PL. Filling the giant PL album seemed daunting and I wanted to make sure it was something I could easily stick to the habit. The 6x8 Simple Stories Snap album seemed like the perfect size. I absolutely love it now! One album filled up very quickly covering months February (I started a little late) August, and another filled up with September through November. Since December is going to be a photo-filled month, I decided to start a whole new album just for December Daily. I'm glad I did because the foundational pages alone have already bulked up the album plenty!

I envisioned this year's December Daily to have a mix of wintry turquoise, silvers, golds, textured whites, kraft, and spots of coral and red. Like my 2011 December Daily album, I wanted a transparent, layered look and like my 2012 December Daily album, I wanted crisp black stamped sentiments and images -- for which Mama Elephant stamps are truly perfect.

Unlike most December Daily albums going through just the 25 days of Christmas, I like to document all 31 days. I imagine throughout the month of December, as I'm actually printing out photos and filling up the album, I will be moving some of these pages and elements around to make it fit around my December. But the point of having foundational pages is that, I'll have all of these pages as a base and if I have more or less photos, I can simply add page protectors or move some of the foundational pages around. I'm sure by January, this album will look very different and that's totally ok with me. :) Here's a look at all of the foundational pages I put together.

Title Page: 

To create this page, I used Inline Letters to stamp "joy" multiple times on a Midnight Project Life card in black and grey. I then die cut "2013" from the Inline Letters Creative Cuts die cuts. And then I stamped the little deer image from the Winter Wonderland set. To further give it some dimension, I die cut tissue paper features from the Fair Feathers Creative Cuts dies. I wanted to keep it fairly simple, so I didn't stamp the coordinating feather images. Instead, I cut little slits in the feathers in various parts of the feathers to give each a slightly unique look.

Day 1 layout: 

To create the "Day One" tag, I stamped "day" with Inline Letters and then used the coordinating Inline Letters Creative Cuts dies to cut out "one". Then I used the Silhouette to die cut "dec" and layer it onto the Embellished Tag. As you can see, I put in packets of sequin stars in the slots where I would expect to use them. By laying down a foundation ahead of time, it will be easy to just slip photos in and jot down simple journaling during the busy days of December.

Day 2 tag: For the day 2 tag, I used a ton of sequins and glued them to the base card. I then die cut "day" using the Inline Letters Creative Cuts dies and stamped the number "2".

Day 3 tag: For the day 3 tag, I simply die cut the word "day" using the same kraft color cardstock as the tag base for a tone on tone shadow look. I then die cut the number "3" and put a piece of glitter cardstock beneath it. I then finished it off with a few sequins. To keep a light transparent look, I adhered the tag onto a piece of transparency.

Day 4 & 5 layout: To create the day 4 and day 5 tag, I stamped the words "day" with Inline Letters and then stamped the numbers outline image from the Four Seasons set beneath it. To highlight the actual days "4" and "5", I filled the outline numbers with gold and silver Stickles.

Day 6 layout: For the day 6 tag, I stamped the "day six" letters using Inline Letters in grey on the tag. I again decided to go for a transparent look by adhering the tag to a clear transparency. To give it a bit of depth, I sprinkled some silver stars in the pocket and stitched it up. For the right side of the layout, I put green glitter in to a stitched vellum pouch. The photo doesn't quite show the little green specks peeking through the vellum, but there's a nice pine needle feel about this page in the background. I then took a regular shipping tag, stamped "twinkle all the way" from Merry Greetings on it, and added sequins and stars from Confetti in black and silver ink.

Day 7 & 8 layout: To create the day 7 tag, I used the Inline Letters Creative Cuts dies to die cut "day 7" in vellum. I then added a piece of silver doily to the edge of the tag to give it a bit of texture. To add more dimension, I die cut a heart filled kraft card using the Silhouette and backed the tag to keep a fairly transparent and airy look. On the left, I added a piece of white glitter decorated cardstock to the back of the vellum pouch from the day 6 layout. I added some Fair Feathers die cuts and sequins. I envision stamping a label of some sort and adding it underneath "Dec" once I have photos in December. As you can see, I also added a pouch of gold stars in the bottom pocket, again so that all I have to do is add photos and sprinkle the gold stars in December. On the backside of the day 7 tag, the heart die cut card nicely matches the day 8 kraft tag.

Day 9 & 10 tag: To create the day 9 tag, I die cute "day" from vellum and adhered it to a woodgrain tag. I then die cut the number "9" from the woodgrain tag and slipped a piece of silver glitter cardstock under it. Then in the left pocket, I stamped the word "cherish" from Remember December in white several times on transparency added some clear glitter stars in the pocket and stitched it up. The day 10 tag is on the other side of the day 9 tag. I love how the stars in the transparent pocket beautifully sparkles through the backside of the pocket.

Day 11 layout: To create the day 11 tag, I die cut "11" from white cardstock, adhered it to a clear transparency Embellished Tag, added gold stars, stitched up the tag to another piece of transparency, adhered a Silhouette-cut "Dec", added silver sequins to the pocket, and then stitched up the pocket.

Day 12 through 14: To create the day 12 tag, I stamped the word "day" using the Inline Letters set and the numbers outline from Four Seasons. I then added silver Stickles to the numbers 1 and 2 to highlight "12". To the left of the tag, is actually the back of the day 12 tag which is a clear tag sewn to a piece of transparency sandwiching some tiny glitter stars and then I added large silver sequins to the back pocket and stitched up the pocket.

I really love stamping on transparencies because it's such a nice layered look. Here I stamped a family of deers using Winter Wonderland and a sentiment from Cinnamon Spice on a piece of transparency. 

Here's a view of the stamped transparency in its full layout with pattern paper . It has a nice faint white shadowy touch.

Here's the backside of the stamped transparency on the left in the full layout. I love that the stamped image shows through both sides and adds a nice touch of dimension and texture in a light airy way.

Sometimes, if I have a simple tag design like "14", I added a striking Project Life card next to it to give it that extra pop. I love this gold foil card from Studio Calico!

Day 15 tag: For the day 15 tag, I die cut the tag from an old Hambly overlay. I then die cut the number "15" from the overlay tag for a super transparent look. To give it a sense of transparency, I added a piece of silver doily and some gold glitter stars to the pocket.

Day 16 & 17 layout: I love the look and function of envelopes, so I added a couple to the day 16 and 7 layouts. The turquoise one is perfect for larger memorabilia such as ticket stubs, receipts, or tags. For the smaller ones on the day 17 layout, I think I'll be saving that for notes that my husband and I will be writing to remember the holiday moments together. It'll be fun, twenty years from now to look at those notes.

Day 18 layout: For the day 18 tag, I kept it very simple by die cutting "day 18" from the same kraft cardstock as the tag base and adhered it to the tag for a tone on tone shadow look. To the right of the tag, I stamped the words "celebrate", "capture", "remember", and "cherish" from Remember December to a Midnight Project Life card. That's what I really love about the Mama Elephant stamps, they can be added to any preprinted Project Life card for a lovely unique look.

Day 19 layout: For the day 19 tag, I die cut the number "19" from cardstock, adhered it to a Hambly overlay tag, and then further adhered it to a piece of gold cardstock.

Day 20 tag: To create the day 20 tag, I die cut "day 20" from a vellum tag and added clear star confetti to the pouch and stitched the pocket up. I really love the layered, yet transparent look.

Day 21 layout: For the day 21 tag, I simply stamped "day 21" onto an Embellished Tag die cut and adhered it to a piece of gold glitter cardstock.

Day 22 layout & 23 tag: For the day 22 tag, I simply stamped "22" using Inline Letters on a tag and added a flair to the tag. On the right page of the layout, I stamped the sentiment "merry, merry, merry, merry" from Merry Greetings and a bunch of sequins and hearts from Confetti onto a shipping tag.

I love the Fair Feathers Creative Cuts dies. Just as I did with the title page, I cut some extra slits in the die cut feathers just to give each a little more of a unique look.

Day 24 tag: To create the day 24 tag, I die cut the tag using Embellished Tag from a polka dot-embossed kraft cardstock, adhered it to a piece of transparency, sprinkled gold glitter stars behind the transparency, and stitched up the pocket. I love how the stars fall under the die cut number "24" for a sparkly transparent look.

Day 25 tag & 26 layout: To create the day 25 tag, I die cut "day 25" using Inline Letters Creative Cuts dies from a woodgrain tag. I put washi tape behind the word "day" and silver glitter cardstock behind "25". I then layered the tag on top of a piece of pattern cardstock. To the right of the tag, you'll see the back of the day 24 tag/pocket. By adding glitter hearts to the back of the pocket, the transparent backside of the pocket blends in with the rest of the page nicely.

Day 27 & 28 layout: To create the Dec 27 tag, I die cut the number "27" using Inline Letters Creative Cuts dies and die cut the tag using Embellished Tag, both from vellum paper for a tone on tone shadow look. I then used my Silhouette to die cut "Dec" from a piece of woodgrain paper and adhered it above "27". On the right side of the layout, I adhered silver glitter label-shaped cardstock to a piece of transparency. On the backside of the transparency, I adhered another white glitter label-shaped cardstock to the day 28 layout.

Day 29 layout: To create the day 29 tag, I simply combined stamping the word "Day" using Inline Letters and die cut the number "29" using the coordinating Inline Letters Creative Cuts dies and slipped silver glitter cardstock behind the number opening. Also on this layout, I added a kraft envelope to collect memorabilia throughout December. I added a shipping tag, stamped with a deer image from Winter Wonderland, "love" using Inline Letters, and a silver bow from Confetti.

Day 30 tag: For the day 30 tag, I simply die cut the number "30" using the Inline Letters Creative Cuts dies from a Hambly overlay tag created using the Embellished Tag Creative Cuts die. To the right of the tag, I created another tag by stamping images from Winter Wonderland and Cinnamon Spice.

Day 31 tag: For the day 31 tag, I adhered a ton of sequins to a piece of transparency. I then die cut the number "31", using Inline Letters Creative Cuts dies, from an Embellished Tag die cut polka dot-embossed kraft cardstock.

Materials used: Mama Elephant ConfettiFair Feathers Creative Cuts diesFour SeasonsEmbellished Tag Creative Cuts dieInline Letters, coordinating Inline Letters Creative Cuts diesWinter WonderlandRemember DecemberMerry GreetingsMama Elephant Cinnamon Spice stamp set especially designed for the October Studio Calico card add-on kitKnot & Bow silver doilies, gold star glitter, silver start glitter, sequins, Silhouette CameoMidnight Project Life KitSEI Chalet collection, Singer sewing machineStudio Calico Project Life kits6x8 Simple Stories Snap album

Hope you enjoyed a peek at my December Daily foundation pages! Come back in 2014 for a look at my completed December Daily 2013 album!

Thanks for stopping by!

- KRAFTY pearl

Mama Elephant January Stampede

Welcome to Mama Elephant's January Stampede on this terrific Tuesday! January stamps are now available for sale at Mama Elephant, so get shopping as soon as you've finished the blog hop.

If you've come from Lea Lawson's blog, you're right on track. If you're lost, be sure to start the blog hop at the beginning -- the Mama Elephant blog.

To celebrate this month's ME Stampede, Mama Elephant is giving away 3 gift certificates worth $20.00 each and all you have to do is comment for a chance to win! Winners will be chosen at random from the collective blogs in the Stampede. Winners will be announced on the ME blog on Monday, January 21st.

And that's not all, there will also be a surprise giveaway on Mama Elephant's Facebook page, so get your 'like' on and follow.

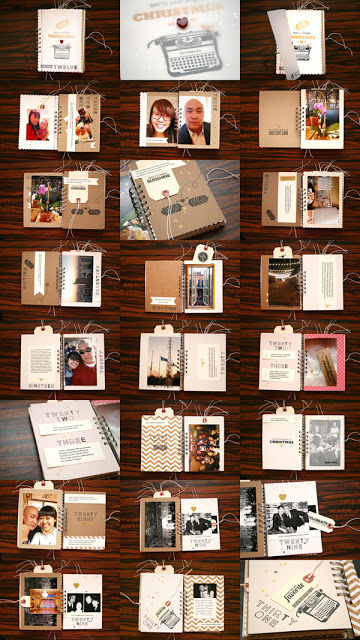
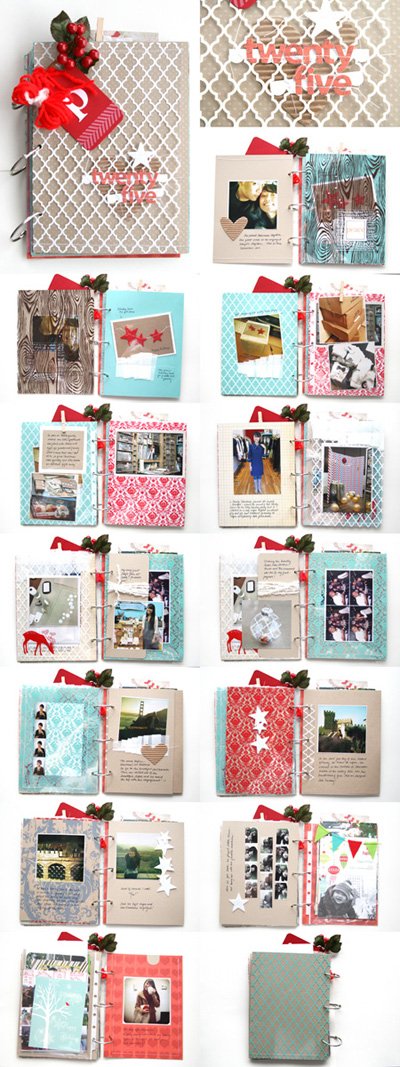
For my January Stampede project, I finished up my December Daily album -- about December Daily here. This is the second year I participated, here's my first. All I needed this year were my Mama Elephant stamps including the latest January release, (which by the way, are darling and perfect for scrapbooking or card making) and the following:
I envisioned capturing December 2012 using neutral tones (ivory, white, nude, kraft, woodgrain, translucent, and light pink) complimented by crisp black and a shiny metallic gold, instead of the usual holiday colors. I also knew I wouldn't have time to actually add to the book on a daily basis, so I threw everything in a box, wrote everything in my Google calendar, printed all my iPhone December photos, and put everything together with the Bind-it-all the first weekend of January -- well after the holiday craziness. Here's how it turned out:
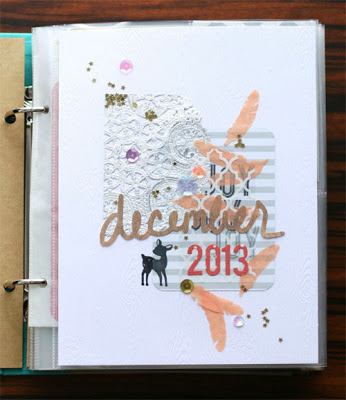
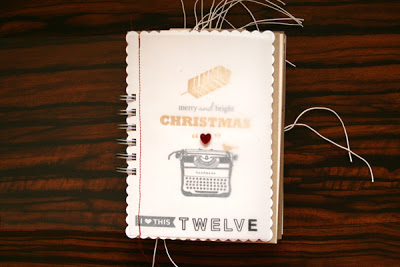
Cover:
Mama Elephant stamps used: Smitten, Polar Pals, Believe in Magic, Type It, and Midnight Letters


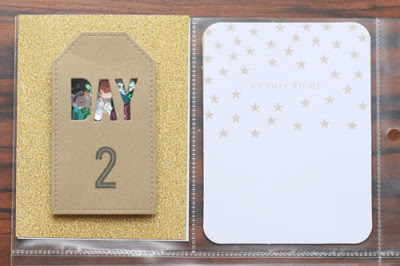
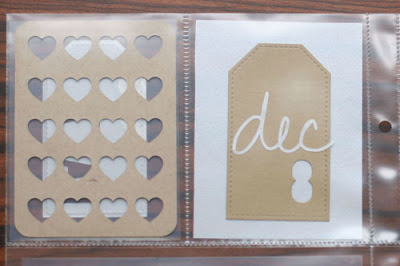
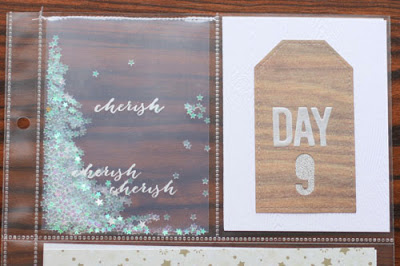
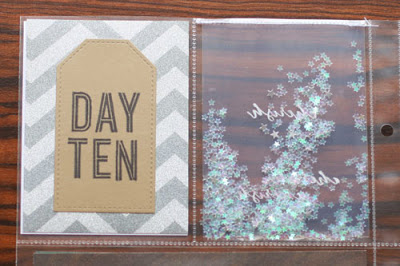
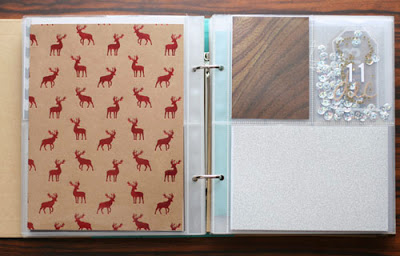
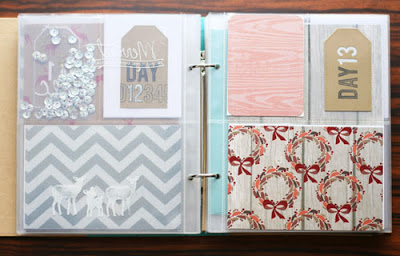
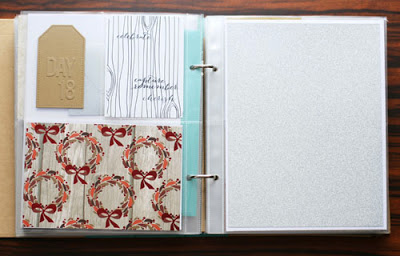
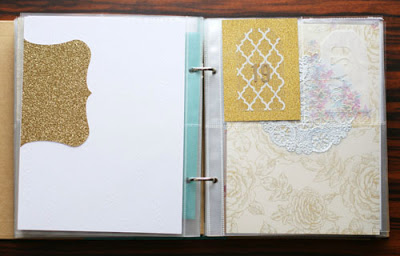
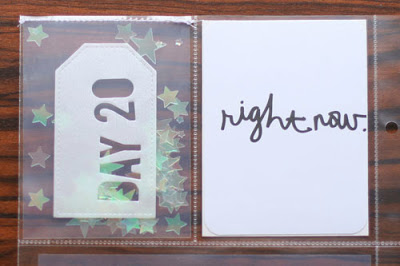
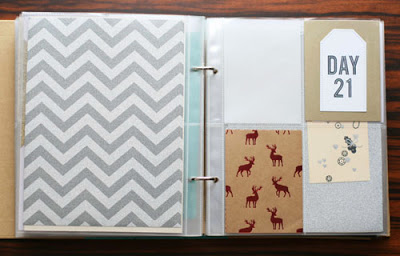
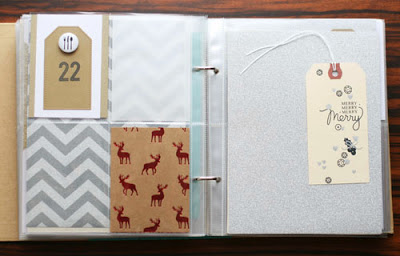
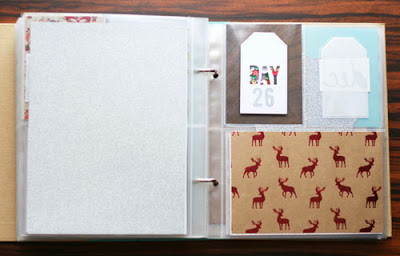
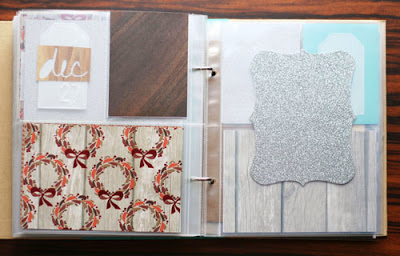
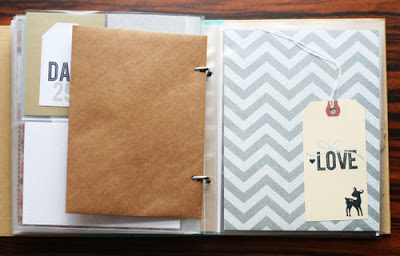
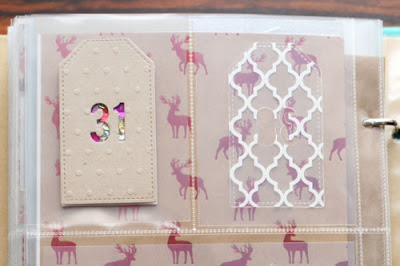
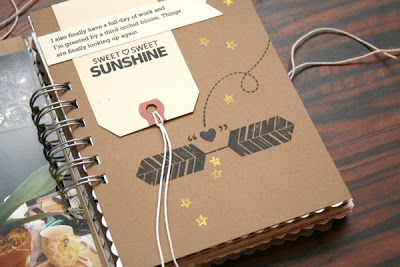
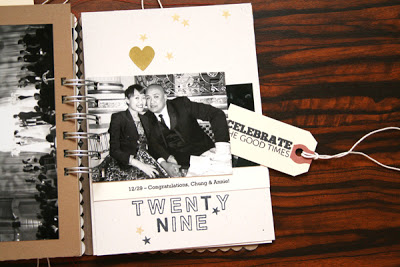
Here's a snippet of the book:

Here's a closer look at how I used the Mama Elephant stamps:
 Mama Elephant stamps used: Smitten (sentiment & feathers), Believe in Magic (stars), Type It (heart in quotes), No Peeking (dotted string)

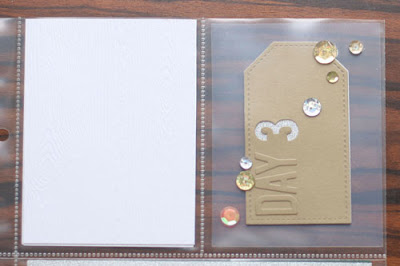
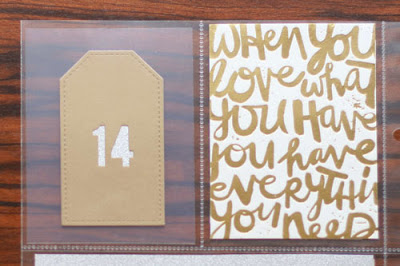
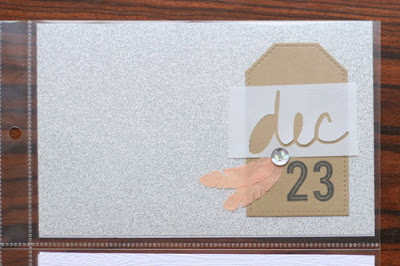
 Mama Elephant stamps used: Smitten (sentiment stamp on tag), Type It (heart in quotes) and Midnight Letters

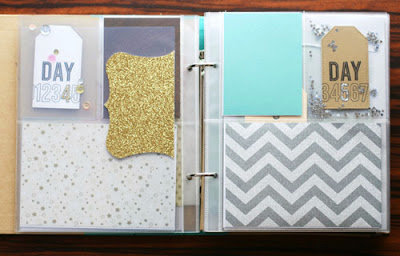
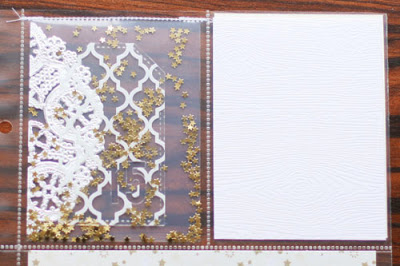
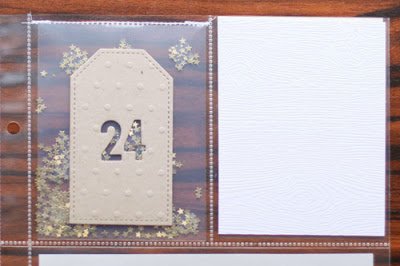
 Mama Elephant stamps used: Good Times (sentiment), Believe in Magic (stars), and Midnight Letters

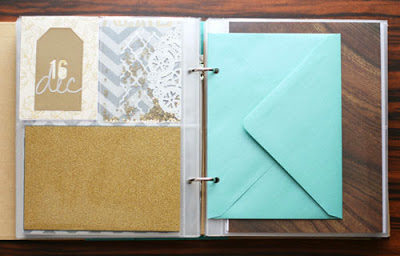
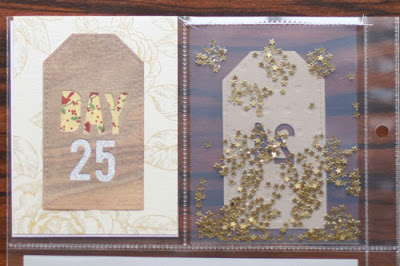
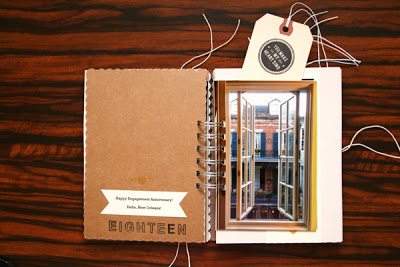
  Mama Elephant stamps used: Smitten (sentiment & barcode), Believe in Magic (stars), Type It (typewriter) and Midnight Letters

Did you participate in December Daily 2012 and have you put your finishing touches on it yet? If not, there's still time to get your hands on these Mama Elephant stamps for the perfect embellishments!

Your next jump is the awesome Savannah O'Gwynn!
 Thanks for stopping by!
- KRAFTY pearl

Simple Spring Shopping Mini Jotters

I've been out and about running errands or doing lots of shopping. (This always happens when the weather changes.) I made mini jotters to keep my hurried life in check. And their covers are perfectly bright and sunny just like the season thanks to the lovely cardstock from the SEI Vanilla Sunshine collection sprinkled in with some SEI Cheery Brights.


Check out the SEI blog for more inspiration!

Thanks for stopping by!
- KRAFTY pearl

Tea Time, Tea Notes

Tea is one of my favorite drinks and if I were to ever throw a tea party, I'd use the lovely Kaisercraft Tigerlilly collection.


Materials Used: Kaisercraft Tigerlilly Blossom Double-Sided 12"X12" Paper, Blush Double-Sided 12"X12" Paper, Pomegranate Double-Sided 12"X12" Paper, Flamingo Double-Sided 12"X12" Paper, Collectables Die-Cuts; Other: embroidery floss, twine, eyelet

Inspired by the lovely floral patterns, I created a notebook to take notes on different tea leaves and brews. To make the perfect tea party set-up, I also created pyramid tea wrappers as favors to collect tea leaves for enjoying after the party!

Hope you like what you see and make sure you stop by the Kaisercraft blog for more inspiration!

Thanks for stopping by!
- KRAFTY pearl

It's Been a While, Hawaii!

I can't help but think about vacations and tropical places in this heart of winter! And so I think of Hawaii!


Materials Used: Hummingbird Paper Pad, Paper (Nectar, Flight, and Feather), Collectables Die-Cuts, Merry Medley Verse Paper, Miss Nelly Her Style Paper, Chipboard Alpha 1 and 2, Grass Green Paint, Tiny Alphas; Other: Round punch

The Kaisercraft Hummingbird collection is perfectly coordinated and wonderful for making a tropical vacation album. I even pulled up some older Kaisercraft collections such as the Merry Medley and Miss Nelly which combines so well for a thick mini scrapbook album. The Hummingbird Collectable Die-Cuts are also perfect for easy and effect embellishment for a cohesive album. If you have a stack of photos from your last tropical vacation still waiting to be scrapbooked, this collection is a perfect match!

Thanks for stopping by!
- KRAFTY pearl

Home Is Where the Heart Is

Hope you had a great weekend! Today, I'm sharing a special little mini album. I love my apartment and all the bright colors in it. There isn't a single detail I didn't design myself. I documented my labor of love in this mini album:


Materials Used: Kaisercraft Lil Primrose Proper, Collectables Die-Cuts, Paper Pad, Tiny Alphas

This is my first own home, a cozy apartment with many bright contrasting and welcoming colors. The Kaisercraft Lil Primrose collection had just the perfect touch and colors to complement the photos. The best part of the mini is how easy it is to make.

To create your own house shaped mini album, cut a 2 inch by 12 inch strip of cardstock. Score at every 2 inch mark, and fold in a zig zag manner. To create the door, cut a small piece of pattern paper and fold in half, adhere to the front of the house, and finally add a pearl to create the doorknob. Add photos and embellishments to finish the mini.

Thanks for stopping by!
- KRAFTY pearl

December Daily Finished

As wedding planning has taken front and center with my time, I am just a bit behind on posting projects. Today I thought I'd share my completely finished December Daily. Here's what I started off with.

Materials Used: Hambly Overlays: Lattice, Woodgrain, Mini Brocade; Hambly Pattern Papers: Brocade Blossom, Lattice; Hambly Rub-ons: Holiday Reindeer, Banners & Pennants; Stick-It Glimmer Stars, Jillibean Soup corrugated die-cuts, Janome Sew Mini Sewing Machine, sequins, white tissue paper, mini sheet protectors, various doilies

Turquoise and red is one of my favorite combinations especially when in conjunction with a winter theme. And I love how it turned out with all the Hambly overlays!

On the front cover, there is a yarn mistletoe bouquet created using gift wrapping remnants. I wanted to capture the true essence of the month so I sprinkled in lots of December memorabilia in that same way, making them embellishments. The pre-sewn embellishments and pockets turned out to be wonderful and made the daily process so much easier, being able to tuck in pictures, papers, cards and remnants throughout the album. That's it for now!

Thanks for stopping by!
- KRAFTY pearl

Staying Organized in December

I find it particularly hard to keep it all together in December, largely due to all the events, gift buying, and new year planning. Don't get me wrong, it's my favorite time of year. Lots of tying up loose ends as well as beginning new plans and resolutions. So the remainder of December's projects will be things crafted to help me stay organized through the end of the year. I'll let you know how I do with my newly crafted organization tools come January. :)

If you're like me, you have tons of post-it notes floating everywhere with all kinds of lists that are always at the wrong places when you need them. Welp, my solution this year is to keep a pocket organizer just for the last two months of the year when all the hustle and bustle occurs.

pearllui-sei-dec-holidayplanner-composite-600

Materials Used: SEI Holiday Cheer, White Elegance collections; Janome Sew Mini Sewing Machine, circle punches

Inside there's a November and December calendar, a lists of various to-do's, a place to collect coupons and slip in anything else such as receipts from gift purchases, etc.

To create the organizer, I sewed three 5 1/2 x 8 sheet protectors together. The third sheet protector was sewn in half. I then cut a slit in the middle of the pockets for coupon and receipt storage. (Yep, that's a Michael's coupon.)

So far this system has proven to work quite well for me. The best part about this is that once this year completes, I have all of my lists and plans all stored and documented in one place. And, next year, I'll be able to look at all of my lists from this year.

Hope you like this idea and be sure to check out the SEI blog for more inspiration!

Thanks for stopping by!
- KRAFTY pearl

Thankful for Simple Pleasures

To round off November, I'm sharing a project I made using the awesome SEI Homestead collection. I made a mini book to document a lovely trip to upstate NY.

pearllui-sei-nov-homestead-mini-composite-600

Materials Used: SEI Homestead Collection pattern papers, stickers, die-cut leaves, Silver Valley button; Others: Whisker Graphics twine, embroidery floss, doilies, Big Shot die-cut machine, die, markers, Janome Sew Mini Sewing Machine


SEI pattern papers have this great thick quality to them making sturdy mini album pages and a cover. Some interesting things to note in the mini is how it is made up of just 4 pieces of paper scored and sewed together using a sewing machine. The design is just as interesting because the cover is actually a tri-fold so there is a flap that flips over the front cover and when the flap is opened, it reveals staggered pages. Lastly, a long piece of twine is wrapped around the album several times and securered to a button to keep the bulky pages of the book enclosed in a neat little package.

And remember to check out more inspiration on the SEI blog!

Thanks for stopping by!
- KRAFTY pearl