Kaisercraft Tuesday Tip: Dimensional Hearts

Here to post a Kaisercraft Tuesday Tip one week late...

As you have likely seen in many of my projects, I love using hearts in different ways to create dimension and patterns. Today, I’m going to show how you can simply use pattern paper and hearts folded in half to create a simple and sweet turning note card.

Materials Used: Kaisercraft Technologic Paper Pad, Kaisercraft Pearl Brad, Martha Stewart Heart punch, Stampin' Up Scallop Edge punch, doily

Step 1: Punch hearts right-side-up and upside-down.


Step 2: Fold hearts in half and paste one side of the base down. Alternate to create a pattern or do it randomly to create random dimension.


It's so simple! The best part about this card is that you get dimension but it folds up and mails relatively flat. You can also make this a card instead of a turning note card by leaving the pearl brad out.


Thanks for stopping by!
- KRAFTY pearl

A Christmas Mini Book

Happy Friday! Want to make something fun this weekend? How about a quick mini album with just one sheet of paper?

To make sure I keep my head above water come the busy holiday season, I made this Christmas mini book ahead of time. I used the Kaisercraft Silly Season collection for its fun pinks, greens and pops of reds. I can't wait to start filling it out in December!

pearllui-kaisercraft-sillyseason-16pgmini-600

Tip: The Kaisercraft Silly Season “Milk & Cookies” pattern paper is perfect for a mini book because it comes printed with natural 16 mini page delineations. You can Google for all the different ways of making a mini book, but my favorite is the meander mini book because it’s the easiest to make (in my opinion).

1. Trim paper down to a 4×4 grid, then score at lines shown below:

pearllui-kaisercraft-16pgmini-tutorial-step1

2. Cut paper at dotted lines shown below:

pearllui-kaisercraft-16pgmini-tutorial-step2

3. Beginning at either end, fold at each scored line in a zig zag accordian pattern until you get to the fourth block where you fold up or down instead of left or right. Simply repeat this until the entire page is folded into a book.

4. There will be natural “pockets” where the up and down folds are made. You’ll have the option of gluing down the entire pocket or just apply glue in a “U” shape around 3 edges of the page to make a pocket. I made pockets to store journaling tags.

5. Finally, embellish the mini book with Jewels, Journal Tags, Printed Chipboard, and die-cuts from the back of the 6.5″x6.5″ Paper Pad.

Materials Used: Kaisercraft Silly Season Milk & Cookies (P728), Gingerbread (P729), Journal Tags (JT626), Printed Chipboard (CB133), Paper Pad (PP851), Jewels (RS424); Other: Ribbon

It’s super easy and fun to make, so I hope you’ll make one for yourself!

Thanks for stopping by!
- KRAFTY pearl

My New Teal Wood Grain Memo Board!

Lately, I've been playing around a lot with KaiserCraft goodies... extending myself "Beyond The Page" to make cute decorative pieces for my home. Their MDF products are perfect for it too! I've wanted a cute little memo board for my kitchen for the longest, but couldn't find one that truly fit my style. When I saw the KaiserCraft bracket frame, I knew it was perfect to create my own memo board... a teal wood grain memo board.

pearllui-kaisercraftmemoboard01-blog400

Used: KaiserCraft bracket frame, KaiserCraft KaiserColour in tropical water and antique white, Ikea fabric, Whisker Graphics baker's twine, Lara's Crafts dowel cap 1 1/8" (found at local Michael's, but can also be found here online), Lara's Crafts small clothespins (also found at local Michael's), Fishs Eddy's mini salt shaker, Mod Podge; miscellaneous: heart buttons, tacks, woodgrainer comb, paint comb, painter's tape

Displayed: Fuji Instax instant photo (love),
Jillibean corrugated heart
, My Little Shoebox woodsy pattern paper, American Crafts Lizzy celebrate sunshine stamp

I loved how it turned out and hope you do too! Here's how I made it and some tips & techniques.

Painting the frame:
  1. Apply 4-5 layers of your base color directly on the frame, letting each layer to dry for about 5-10 minutes each. Your base color should be the lighter color since light on top of dark won't "grain" as well as dark on light. Since I chose my wood grain pattern to be comprised of teal (KaiserColour in tropical water) and antique white (KaiserColour in antique white), antique white would be the base color. Tip 1: I suggest 4-5 layers for the base color because likely it is less opaque and will take more applications to saturate the whole surface. Tip 2: Also, since the surface is fairly smooth, using brushes would show brush marks. So instead, I picked up a handy Whizz touch up and trim kit from a local Lowes (it comes with 2" roller, tray and 2" high density foam roller cover) to apply the paint. It worked like a charm and NO brush strokes! Best part, you can actually reuse everything with a good rinse in warm water. After some usage, you'll just need to replace the foam roller cover.
  2. Seal the first color by applying 2 glossy Mod Podge layers and let dry overnight so that all previous layers harden. Tip: By using glossy Mod Podge, you create a slick layer so it's smoother as you push the second color later.
  3. Tape areas where you want to keep as the base color with painter's tape. I wanted the beveled inner and outer trims to remain antique white. Tip: To seal the rounded areas, just cut smaller pieces of tape to follow the curvature of the shape.
  4. Using a cheap chip brush, apply the second pattern color fully on the surface. While the color is still wet and glistening, use a woodgrainer or a comb to drag the wet paint and apply the wood pattern. Tip: Most woodgrainers are pretty large in width (because they're usually for large surfaces such as walls or furniture) and the surface of this frame is too small to fully optimize the pattern. So instead, I used a combination of paint comb drag and a toothpick! Yep, a simple tooth pick broken in half, taking the broken side drags paint just as well. I created a smaller eye in the upper right corner with this technique.
  5. Finally, seal one more time with a coat or two of Mod Podge.
Creating the clothespin line:

pearllui-kaisercraftmemoboard02-detail01-blog400

  1. Use two wooden dowel caps. You can also use thread spools or cute knobs. I painted the wooden dowel caps and adhered it to the frame using more Mod Podge. (Love that stuff!) Tip: If you decide to go with another wooden item to hold the ends of your clothesline, use a takeout chopstick and a large glue dot to hold the wooden item in place as you paint it so you don't get paint all over your fingers as you paint around it.
  2. Using a string of baker's twine, long enough to more than double the distance between the clothesline ends, tie a knot and then twist the twine until you get the desired tension and drop, then hang the ends on the "knobs". Tip: With this technique, you can change out the clothesline whenever you want a change! You can use jute, ribbon, embroidery floss... the possibilities are endless!
Other decorative elements:

pearllui-kaisercraftmemoboard02-detail02-blog400

  • Wrap fabric around a thick layer of foam to create the inner area for tacking. Tip: You can also use cork board squares, but I chose to use fabric over foam so that I can also easily slip sheets of paper (in this case, an Instax photo) to the side of the frame because the foam although is thick, has give that corkboard doesn't have.
  • Create button tacks by simply apply flat back buttons to flat top tacks.
  • I wanted the memo board to almost be like mini desk in the middle of my kitchen, so I added a mini "vase" to it. The "vase" is a mini salt shaker from one of my fave stores here in NYC, Fishs Eddy. To keep the clarity of the glass, I adhered it with Mod Podge. Tip: You can also add other "storage" elements to the frame, if you're not a flower person, by adhering a small tin box (to store a small sewing kit or matches) or another mini frame/bunch of mini frames instead (so you can interchange even more photos). How cute would these be running down the side of a memo board?
  • Do the flowers look familiar? They're crepe paper roses from my previous tutorial here.
I have to say I'm totally loving this frame because it's a memo board but it can also be a picture frame! I love functional and versatility! Currently, I'm using it more as a frame.

So what do you think?

pearllui-kaisercraftmemoboard02-blog400

And lastly but certainly not least, I wanted to thank Julie of Julie's Open Window for linking me as one of the 'new blogs you must see'! It's always so exciting to see support and encouragement from the craft community as a rookie blogger like myself!

Until the next post!
- KRAFTY pearl


Thanks for linking:
Get Your Craft On Tuesday
Tip Junkie handmade projects

On My Window Sill

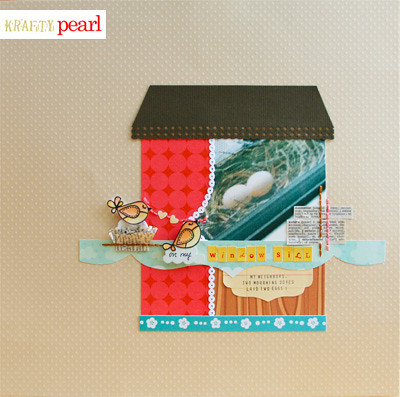
It all started one March morning with the mourning dove coo, the sound of fluttering wings and twigs banging on my window and I knew spring was near. And a few days later, on my window sill was a nest with two eggs! I spied on them like a National Geographic bird watcher, peeking at them every morning and night. One morning, mama mourning dove actually flew away from the nest momentarily and that's when I had the rare chance to sneak this photo of the eggs.

Inspired by a few challenges this weekend, I finally got around to scrapping about it:

blog-onmwindowsill

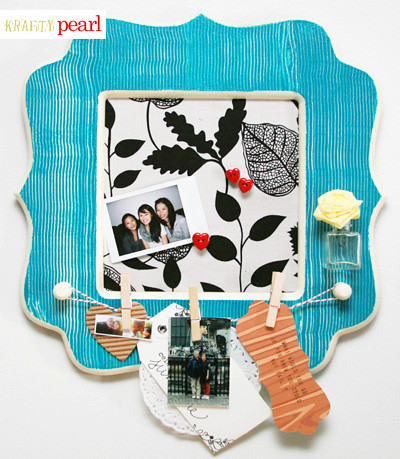
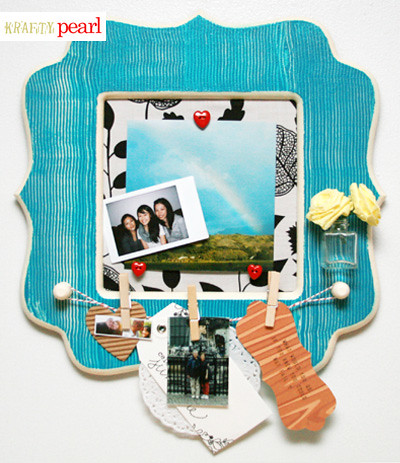
Used: My Little Shoebox pattern papers, stamp, alpha stickers; Bazzill Basics cardstock; 2000 Plus custom stamp kit

When I saw the 
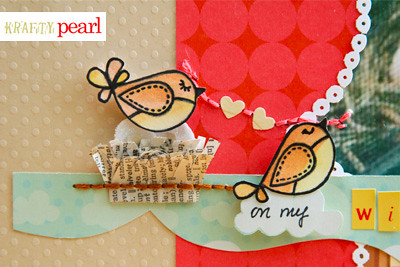
My Little Shoebox March sketch challenge, I knew it was perfect to feature one of my rarest spring sightings as the story. The sketch works out perfectly with how the quadrants lend to the look of a window with curtains. The embellishment cluster in the sketch is also a perfect place for me to show a whimsical re-creation of the birds building their happy, loving nest. It reminds me of this one scene in Cinderella where two birdies help tie a bow in her hair.

blog-onmwindowsilldetail1

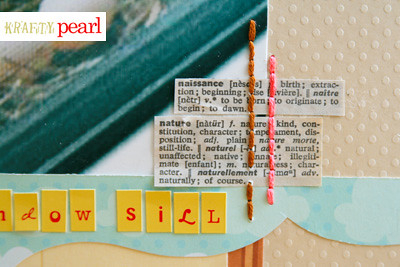
I created the nest embellishment out of an old French-English dictionary page inspired by Cartwheels in My Mind weekend challenge where Cheryl challenged her readers to use a page torn from a book on at least 2 different projects in 2 ways. (My second project using a torn book page to come later this week, so stay tuned!) I then stitched the nest to the page with embroidery floss. I loved the way the nest turned out. Below's a little tutorial to make your own if you like it too! The eggs were hand cut to shape and dipped in glitter.

I also clipped out definitions for 'naissance' and 'nature' and hand-stitched it to the layout:

blog-onmwindowsilldetail2


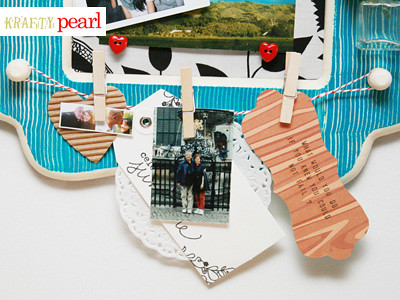
Between handwriting my journaling or stamping it, I definitely appreciated Nichol Magouirk's 
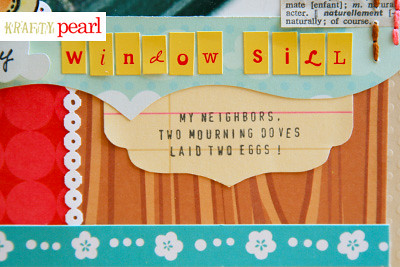
Two Peas in a Bucket April scrapbook stamping challenge to stamp it. Stamped journaling: "My neighbors, two mourning doves, laid two eggs!" I absolutely love this custom stamp kit from Staples that's perfect for stamping two sizes of journaling. The shape of the journaling area was hand-cut using Fiskars fingertip knife, using a remnant diecut sheet as the shape template. The curtain trimming was created by cutting this EK Success Parisian border punch. Also used the same punch for the roof.

blog-onmwindowsilldetail3

And to wrap up this post, I have a very simple tutorial to making your own nest embellishment!

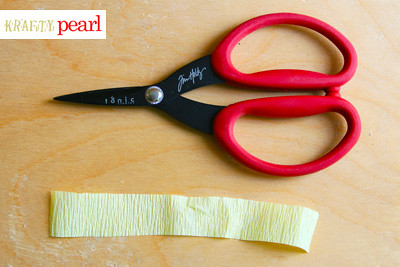
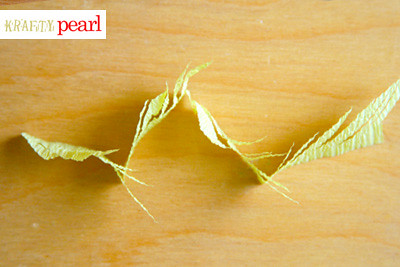
Step 1, all you need is a sharp pair of craft scissors and a strip of paper you want to use to make your nest. (The longer your strip, the fuller the nest.)
blog-nesttutorial1

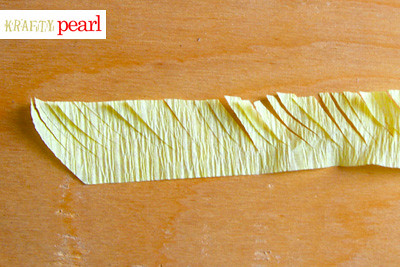
Step 2, take the strip and snip off the opposing corners and make diagonal cuts along the top side of the strip leaving the paper intact to the bottom:
blog-nesttutorial2

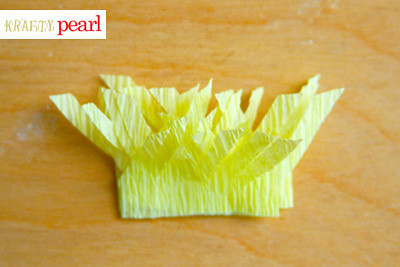
Step 3, fold the strip into a zig zag pattern like so:
blog-nesttutorial3

And voila! You've got your self a nice nest embellishment:
blog-nesttutorial4

So whaddaya think? I hope you like!

Until the next post!
- KRAFTY pearl

Good Ol' Crepe Paper Roses

Crepe paper roses... remember those jammies from way back when? I remember folding bouquets of these for my mom and friends as far back as junior high school. Recently, I decided to incorporate some of these roses in a scrapbook layout. And since then, it's been a favorite flower making technique for me.

Making your own flowers is the trend right now and Cosmo Cricket has a challenge to make your own flowers on their blog. So here's what I made. A simple stamped tag embellished with a glitter-dusted crepe paper rose.

blog - crepe paper rose tag

Used: Warble Dear Lizzy Large Clear Acrylic Stamp Set by American Crafts, crepe paper streamer from Party City :), Martha Stewart glitter


Here's a closer look at the roses:

blog - crepe paper roses details 1


And they're really cute just set up on my desk. Beats real roses because they don't need any maintenance! :)

blog - crepe paper roses details 2

Want to make these for yourself? I have a tutorial below but I encourage you to search for 'crepe paper roses' on Google to find all the different ways of folding and see which technique/end result you'd like to try. Each artist folds them just slightly different giving the roses a different appearance.

Here's my tutorial of the method I learned long ago.

What you'll need: crepe paper streamer (approximately 1.75" width), clear liquid adhesive, old plastic bristle brush for applying glue, washi or flower tape, glitter

blog - crepe paper rose tools


How to:
  1. Cut strips of crepe paper ranging from 18-24 inches. The longer the crepe paper, the fuller and likely tighter your rose will appear. My roses shown above use 24" strips of crepe paper.
  2. Follow steps 1 through 7 in my illustration below.
  3. Brush on some clear liquid adhesive and dust on glitter to add some sparkle and there you have it, crepe paper roses!

blog - crepe paper rose folding instructions


Hope you enjoyed my tutorial!

Update: One last pic of pink roses turned orange using Smooch Spritz in gingersnap (yellow) and some orange glitter. After I let the ink dry, I painted the roses lightly with liquid glue and dipped them into the glitter. So you can actually use any color crepe paper and change its color through spray inks for another take on them.

blog - crepe paper roses smooch spritz glitter

- KRAFTY pearl


P.S. Follow my blog with bloglovin

Personalize Your Wood Grain!

I totally love the look of faux bois! And it's often used in card making and scrapbooking. There are lots of papers and cardstocks out there that have really pretty wood grain pattern:
  1. My Little Shoebox's Woodsy paper
  2. Art Warehouse's Wood Embossed Great Outdoors paper
  3. Karen Foster's Wood Pattern paper
  4. Creative Imaginations Real Wood Veneer paper
But this past Valentine's I really wanted something personalized for my card. So instead, I decided to draw my own tree and wood grain:

blog 1 - valentines day card


Notice anything within the wood grain? Here's a closer look. Do you see it now? Embedded within the pattern, I wrote 'i love you' in script!

blog 2 - valentines day card detail


I loved the result so much, I decided to doodle another piece... 'i adore you' with 'you' centered in the heart:

blog 3 - faux bois i adore you


I also decided to put it in a shadow box as the main focal point but I could do so much more to it. (I bought a nice and simple Ribba shadow box from Ikea. Absolutely love these shadow boxes.) I could put a picture to the left of the heart. I could decorate it with more embellishments. The possibilities are endless.

What's great about drawing out your own wood grain pattern is that you can actually write camouflaged words or designs within the wood grain, really making the piece of art your own!

Here's a quick how-to:

I found the EK Success Zig Memory System Writer Dual Tip Pen Writer the most useful in drawing out my lines because of the sharp consistent point, though I also love doodling with Bic's Mark-It Permanent Markers Fine Point. But feel free to use whatever fine point pen you're most comfortable with controlling your lines.

First, start with your designs or words.

blog 4 - faux bois i adore you diy


Second, draw concentric lines around your designs and words leaving a fair amount of space between your lines. The lines doesn't have to be perfect because that's the beauty of wood grain patterns, they're not perfectly spaced.

blog 5 - faux bois i adore you diy


Third, continue to draw lines around your words or designs and let the imperfections guide you for a perfect faux bois doodle.

blog 6 - faux bois i adore you diy


And there you have it, a pretty piece of art personalized with your own message and design!

blog 7 - faux bois i adore you diy detail


So whaddaya think? Is it a cute personalized keepsake or what?

Until my next post!
- KRAFTY pearl